You’ve just captured the perfect gaming moment. The reaction is genuine, the chat is flying, and the gameplay has a clean payoff. Then you upload it to TikTok and discover that your face is tiny, the HUD is unreadable, captions cover the important action, and viewers ask why the video feels cramped.
That problem usually isn’t caused by the footage. It comes from treating every format called TikTok split screen as the same thing. Native Duets, TikTok’s built-in Split Screen effect, and multi-clip edits made in a separate editor have different workflows, creative limits, and distribution behavior. Creators who understand those differences can choose a layout for the viewing experience, not just because a template looks clever.
For more examples of short-form formats and visual treatments, the AIMVG TikTok Reels page is a useful place to review how different clips are structured.
Table of Contents
- Why TikTok Split Screen Confuses Most Creators
- Creating a Split Screen Using TikTok Duet
- Choosing the Right Split Screen Layout
- Using the TikTok Split Screen Effect on Uploaded Clips
- Repurposing Stream Footage Into Split Screen Shorts
- Layout Choices That Hold Attention
- Quick Checklist Before You Publish
Why TikTok Split Screen Confuses Most Creators
A Twitch streamer often starts with a familiar sequence. They find a great reaction in a VOD, crop the recording, add it beside the gameplay, and post it quickly. The result technically contains two panels, but the facecam is squeezed into a corner, the gameplay still carries a wide desktop composition, and the first moment gives viewers no clear reason to watch both sides.
The phrase TikTok split screen covers at least three different production methods:
- Native Duet: TikTok places your recording alongside another creator’s video. You’re responding to an existing post, and the original clip remains part of the viewing context.
- In-app Split Screen effect: TikTok applies a visual layout to footage you upload or record. It resembles a collaboration format, but it isn’t the same collaboration feature.
- Third-party multi-clip edit: You arrange your own gameplay, facecam, chat capture, reaction, or second camera angle on a shared timeline before uploading a finished video.
Those distinctions matter because the viewer sees similar panels while TikTok handles the posts differently. A Duet is connected to the original creator’s video, while an externally edited upload stands on its own and is distributed as your post. The creative choice and the audience relationship aren’t interchangeable.
Practical rule: Choose Duet when the original post is part of the idea. Choose an edited split screen when control over framing, timing, captions, and branding matters more.
For streamers, the third option often solves the problem. A VOD rarely arrives ready for vertical viewing, so the editor must decide what stays visible, where the face belongs, and how captions avoid the game interface. That’s why a workflow built for multi-shot videos can be more useful than a quick template when both panels come from your own footage.
Creating a Split Screen Using TikTok Duet
TikTok’s native Duet is the cleanest route when you want to respond directly to an existing post. TikTok describes it as a built-in format where two videos play simultaneously, with the split-screen arrangement handled inside the app. The original creator must allow Duets on that video, so the option won’t appear for every post. (TikTok’s Duet settings explains the feature and its controls.)
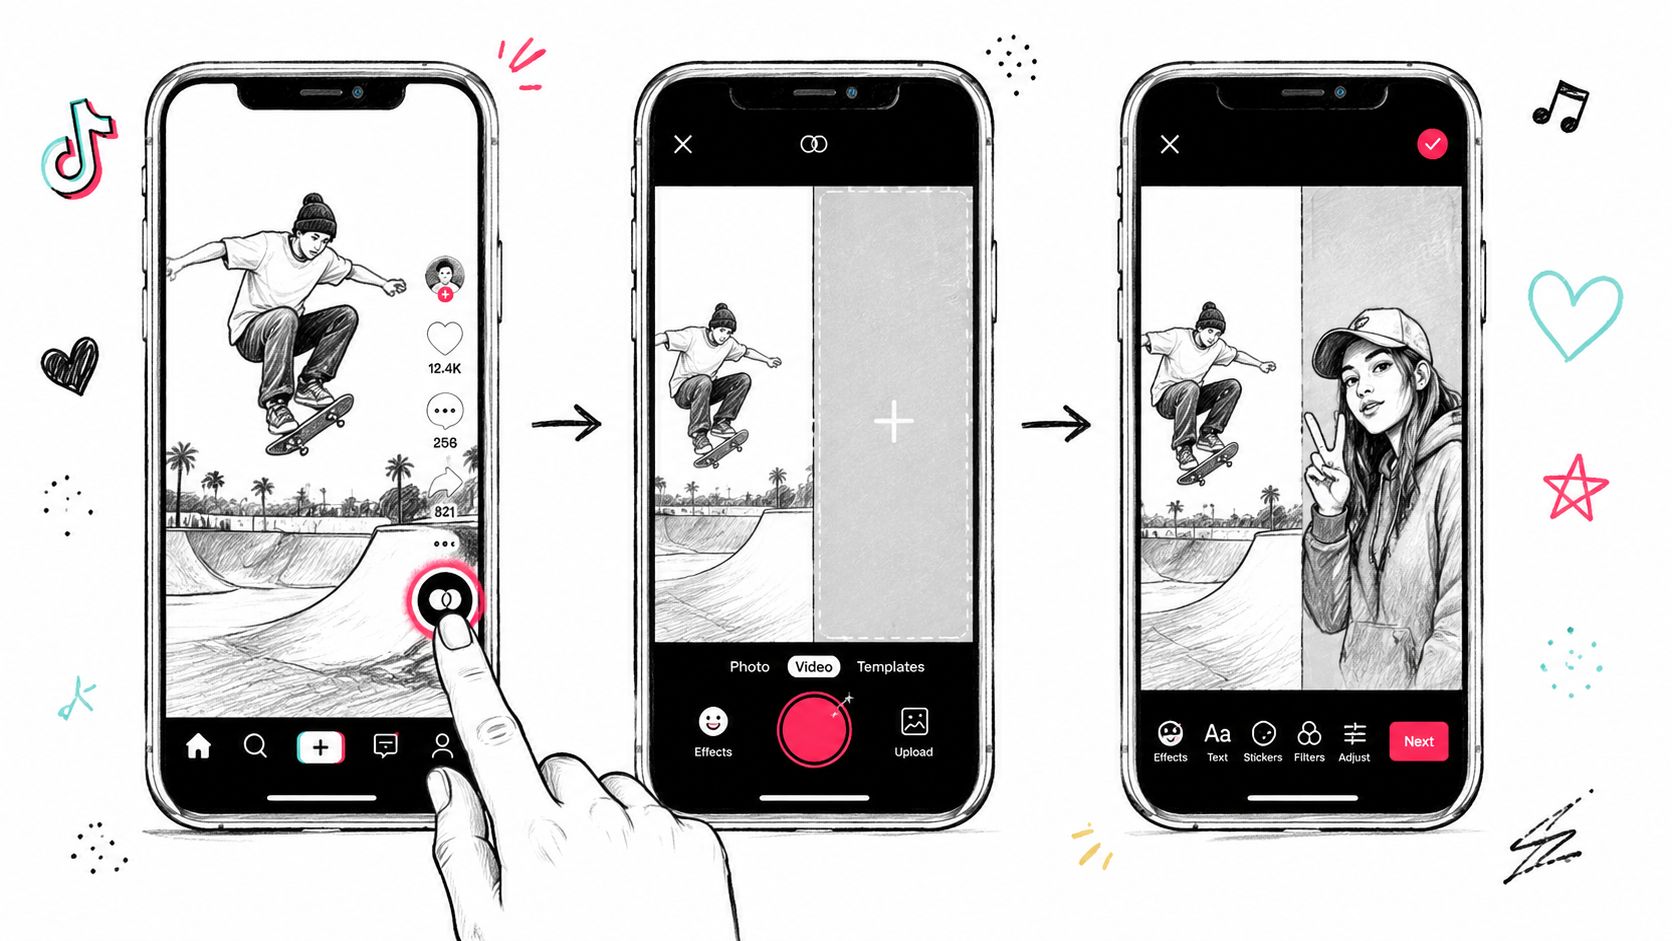
The native workflow
- Find the source video. Open the TikTok you want to answer, reinterpret, react to, or perform alongside.
- Open the sharing menu. Tap the Share arrow, then select Duet if the creator has enabled it.
- Pick the layout. Use the available on-screen layout options to select the arrangement that fits the response. TikTok handles the split-screen placement automatically.
- Record your side. Use the front or rear camera, depending on whether your expression or your environment matters more. For a gaming response, a clear facecam reaction usually carries more context than a distant room view.
- Review before publishing. Tap the checkmark to preview the result. Add text, effects, and other available editing treatments before posting.
The format works well when timing is the creative point. A musician can perform alongside a clip, a commentator can answer a claim, and a gamer can react to another player’s move without downloading and rebuilding the original post.
Where Green Screen Duet fits
TikTok later expanded Duet with additional layouts, including left-right, top-bottom, and a three-screen arrangement during its European rollout in October 2020. By May 2021, TikTok had also introduced Green Screen Duet, which lets the responding creator appear over the original clip instead of remaining in a conventional side-by-side panel. (PCMag’s coverage of Green Screen Duet documents that product evolution.)
The limitation appears when your source is a stream recording. A native Duet inherits the source clip’s framing and visual proportions. If the original video contains wide gameplay, a HUD, chat overlays, and a facecam already embedded in the image, TikTok can’t rebuild that composition for you. You can respond to the clip, but you don’t get detailed control over how each part of a VOD occupies the vertical canvas.
Choosing the Right Split Screen Layout
A split screen should answer one question immediately: which visual deserves the viewer’s attention first? The layout ratio gives you a practical way to answer it before you start editing.
A 50/50 layout gives both panels equal authority. Use it for reactions where the source and the responder carry comparable meaning, two-person conversations, podcast excerpts, or before-and-after comparisons. It’s easy to understand, but it can make both subjects feel small when each frame contains busy background detail.
A 60/40 layout gives the primary clip more room without removing the secondary response. It suits a creator reacting to a specific stream moment, explaining a tutorial step, or adding commentary to an existing clip. The smaller panel should support the main idea rather than compete with it.
A 70/30 layout works when gameplay or a performance is the main event. Keep the facecam, chat commentary, or alternate angle in the narrower panel, but make sure the secondary subject remains expressive and legible. A three-screen arrangement can work for highlight reels that need gameplay, facecam, and another information layer visible together, although every additional panel increases visual competition.
| Layout | Best Use Case | Content Type |
|---|---|---|
| 50/50 | Balanced reactions and comparisons | Duets, conversations, before-and-after clips |
| 60/40 | Main clip with supporting response | Commentary, tutorials, reaction analysis |
| 70/30 | Dominant performance with secondary context | Gameplay, facecam reactions, stream highlights |
| Three-screen | Multiple simultaneous information layers | Gameplay, facecam, chat, or stats |
Research using eye-tracking and facial-expression data found that split-screen visuals can change attention patterns and boost engagement and positive emotional responses compared with non-split-screen conditions. The practical lesson isn’t that every split screen will perform better. Both frames need immediate motion, a clear focal hierarchy, and captions that viewers can read without searching. (The eye-tracking study provides the relevant research context.)
For more editing considerations around vertical composition, see this guide to the best vertical video editor.
Using the TikTok Split Screen Effect on Uploaded Clips
TikTok’s Split Screen effect is useful when you already have footage and want to arrange it inside the app. It isn’t a substitute for Duet. The effect changes the visual presentation of your upload, while Duet connects your response to another creator’s post.
Start by opening TikTok’s creation screen and entering Effects. Find the Split Screen effect, choose the upload option that opens your gallery, and select the clips you want to use. Depending on the effect version and current app interface, the exact labels can vary, so look for the gallery or upload entry attached to the effect rather than assuming every device shows identical wording.
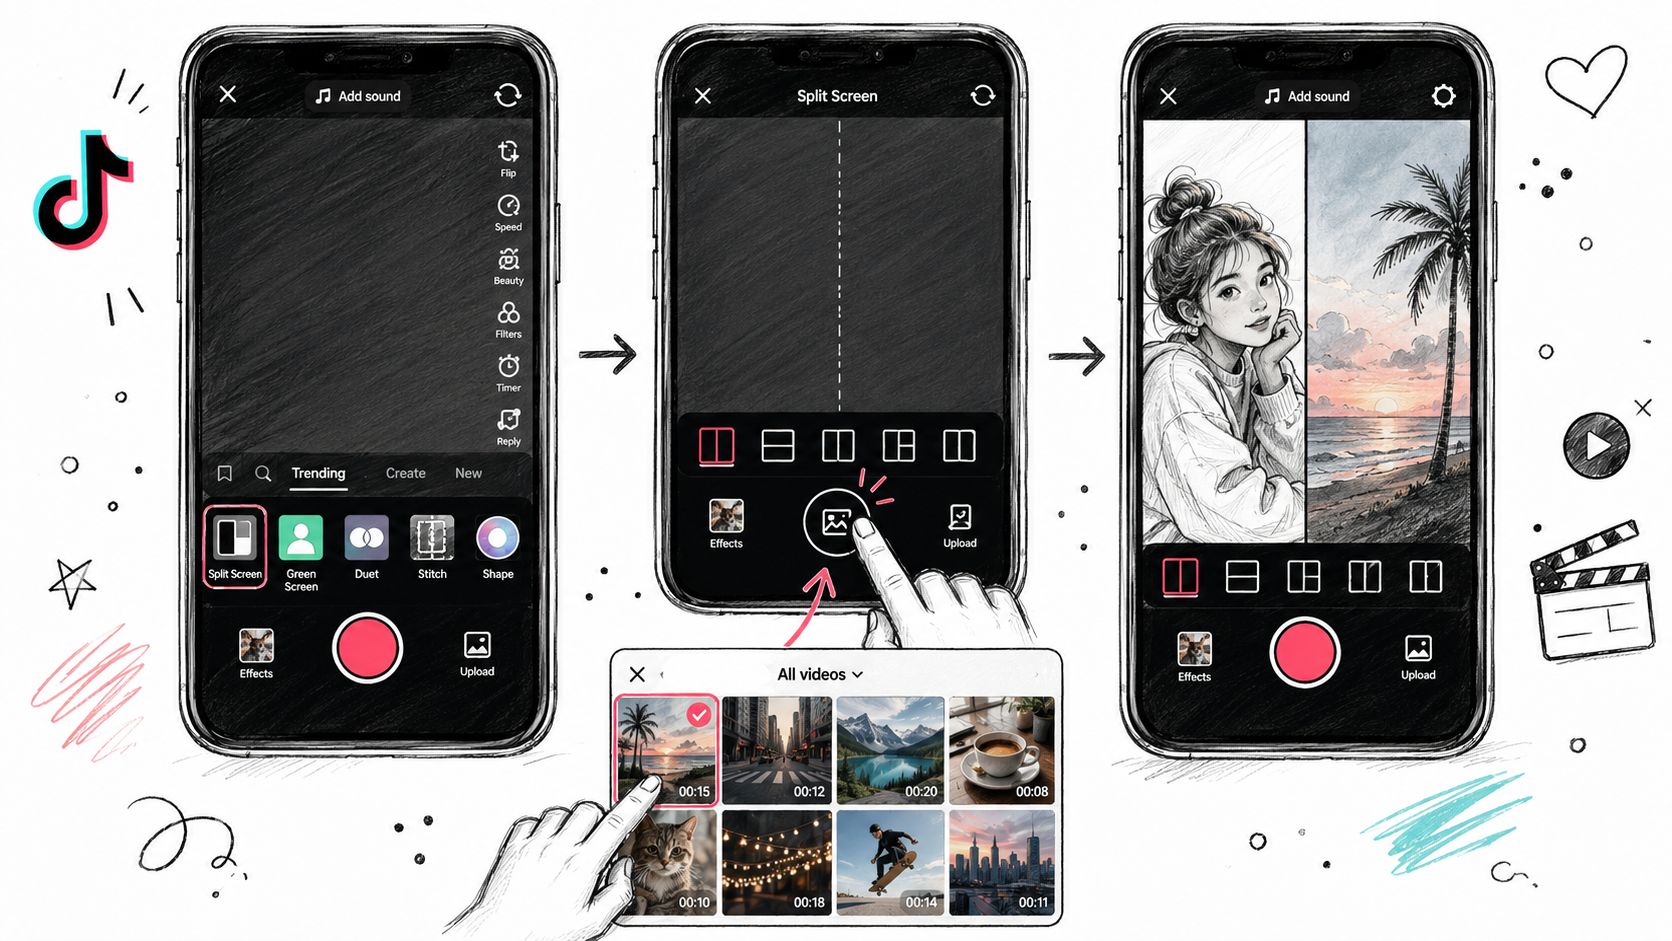
Build the composition before you publish
Use the first strong visual beat as your alignment point. If one clip starts with a reaction and the other begins after the key action, the split screen will feel delayed even when both files have the same duration. Sync the first spoken phrase, impact, gesture, or gameplay event, then preview the transition rather than relying on the timeline alone.
If the effect offers divider controls, adjust the thickness so it separates the panels without consuming useful image area. A heavy divider can make a narrow facecam feel even smaller, while no visible separation can cause the two scenes to blur together.
The effect is a layout overlay. It doesn’t turn your post into a collaboration with the source creator, so it won’t place the result on that creator’s Duet grid. It also follows the discoverability rules of a standard upload and can’t be stitched back into another person’s video through the native Duet relationship.
That difference is easy to miss because the finished post may look similar to a Duet. Treat the effect as a quick in-app composition tool, especially for simple two-clip ideas. For long VOD-derived content, external editing usually gives you more dependable control over crops, caption placement, audio, and timing. The effect may also impose a 60-second cap and apply TikTok’s normal upload and watermark behavior, so check the rendered result before you build a larger publishing workflow around it.
Repurposing Stream Footage Into Split Screen Shorts
A VOD-to-short workflow starts before the split screen. First, identify the moment where the action, reaction, or conversation changes. Then build the vertical composition around that moment instead of forcing the entire desktop recording into a tall frame.
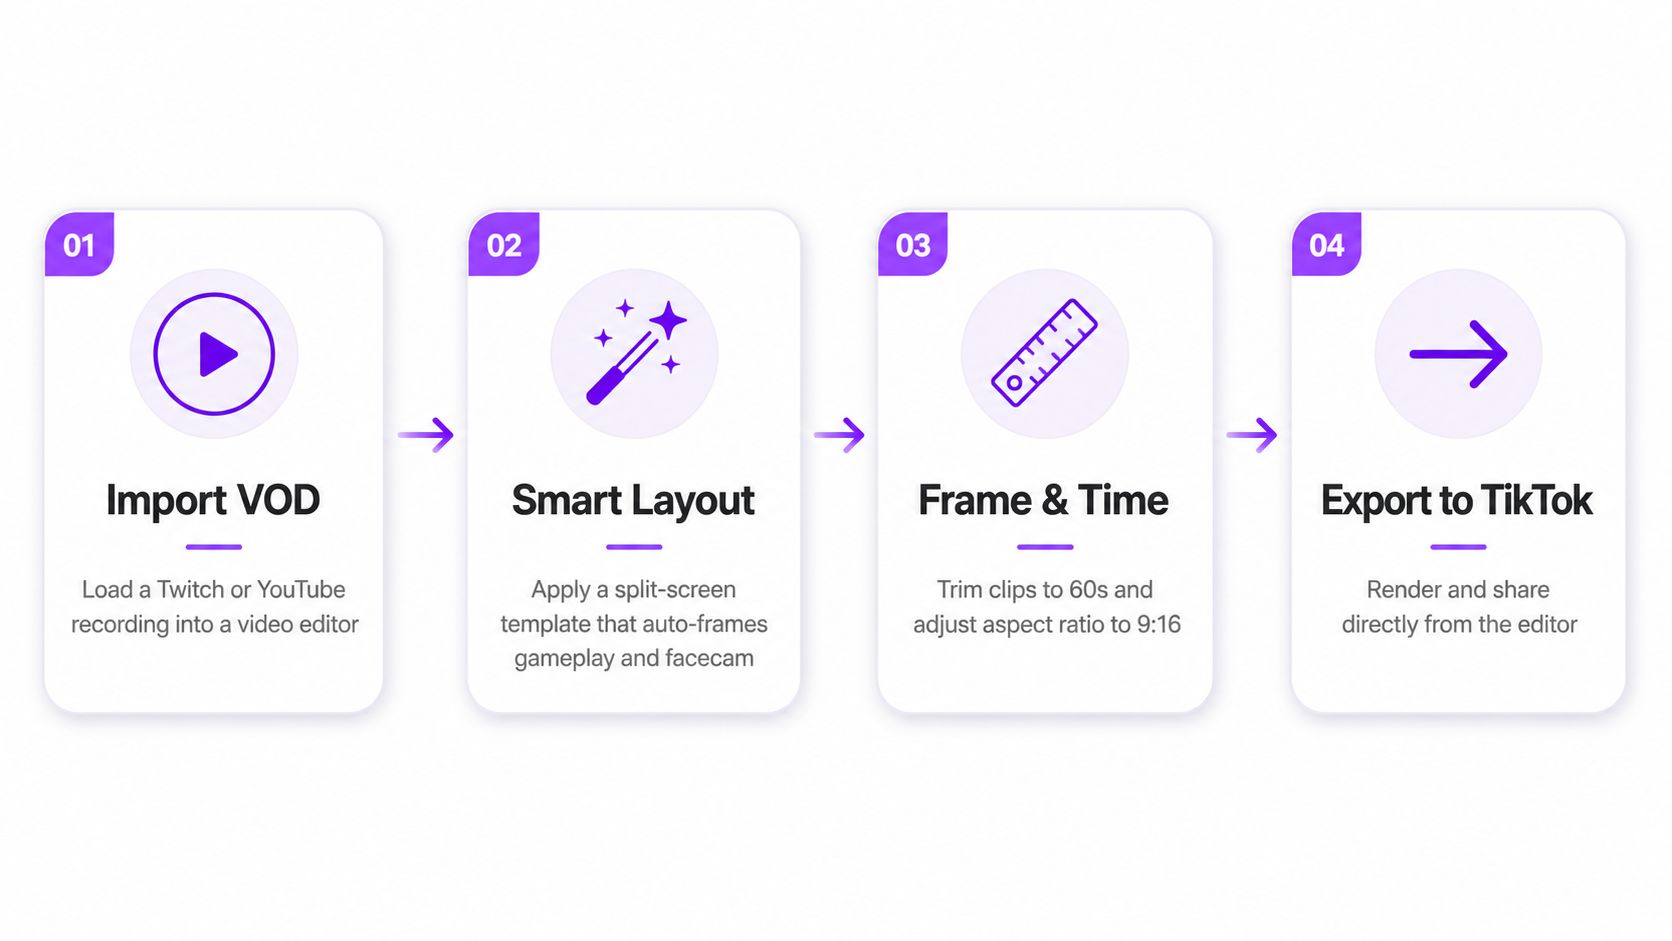
Start with framing, not effects
Import the Twitch or YouTube recording into an editor that can preserve gameplay and facecam as separate visual priorities. A smart layout can place the facecam in one pane and create a vertical crop of the gameplay in the other, which avoids shrinking a wide stream until it becomes unreadable.
The strongest arrangement depends on the clip. Gameplay-led moments usually need the larger panel, while a story about an unexpected reaction may justify giving the facecam more space. Keep the crop anchored to the action. A perfectly centered gameplay frame is still a poor crop if the decisive event happens at the edge.
Captions should share a consistent style across both panes. Place them where they don’t cover health bars, subtitles, chat messages, or the speaker’s mouth. If the speaker changes sides during the edit, move the caption anchor with the voice instead of leaving text in one fixed position.
Tighten the timeline
Remove silence, loading screens, menu navigation, and stretches where neither panel communicates anything. This doesn’t mean cutting every pause. A short pause can make a reaction land, but dead air at the beginning makes the viewer wait before the premise becomes clear.
Trim the final video to TikTok’s required shape and intended duration, then check the timing after every major cut. A common mistake is syncing a gameplay hit or music beat before removing quiet sections. Once those sections disappear, the visual event no longer lands on the intended audio cue.
StreamGen is one option for this type of workflow. Its clip editor supports vertical reframing with smart layouts for gameplay and facecam, animated captions, silence removal, brand presets, and direct posting to TikTok, YouTube Shorts, and Instagram Reels. Its AI Clip Finder can also review long VODs and rank moments using gameplay, reactions, chat, and audio signals, while the VOD Editor can export timeline-ready projects for DaVinci Resolve and Premiere Pro.
For a broader content-repurposing process, this guide to repurposing video content covers the planning side of turning long recordings into short-form posts.
Layout Choices That Hold Attention
The split-screen format doesn’t create retention by itself. Layout, motion, caption placement, and visual contrast determine whether viewers understand the relationship between the panels quickly. A reaction can fail in a 50/50 layout if both frames are static. A simple stacked composition can work when the top panel delivers the setup and the bottom panel delivers the result.
Eye-tracking research on split-screen short-form video points toward a practical production priority: viewers orient based on motion and visual salience, not merely on the existence of two frames. Give the most important action a clear visual lead, then use the second panel to explain, react, or add tension.
For a reaction clip, the dominant panel should carry the event while the secondary panel carries the human response. For a comparison, balance matters more because the viewer needs to inspect both sides. For a before-and-after story, stacking can create a natural progression from setup to outcome.
| Layout | Best For | Eye Path | Caption Anchor |
|---|---|---|---|
| Side-by-side | Comparisons and reactions | Across the central divide | Under the active speaker |
| Stacked | Before-and-after sequences | From the upper result to the lower result | Inside each speaker’s pane |
| Picture-in-picture | Commentary over a main clip | Main action first, reaction second | Near the commentary frame |
| Three-pane | Multi-part narrative arcs | From dominant action through supporting details | Closest to the relevant voice |
Make each pane readable
Put the most expressive or dynamic face in the larger frame when the reaction carries the emotional payoff. If both faces matter equally, reduce background clutter before changing the ratio. A clean, smaller face often communicates better than a larger face surrounded by bright overlays and moving alerts.
Contrast can separate panes without adding heavy borders. Different color temperatures, backgrounds, or lighting levels help viewers understand that each frame has a distinct role. Keep that contrast controlled, because excessive visual difference can make the post feel like unrelated footage.
Captions should follow the speaker, not the editor’s favorite corner. Match the text position to the pane where the voice appears, and protect important game information from text overlays. The research supports prioritizing rapid visual orientation, but the production decision remains yours: make the purpose of each panel obvious before adding decorative effects.
Quick Checklist Before You Publish
A split-screen short doesn’t need a long final review. It needs the right review in the right order. Run this pass while watching the opening, the main payoff, and the final frame.
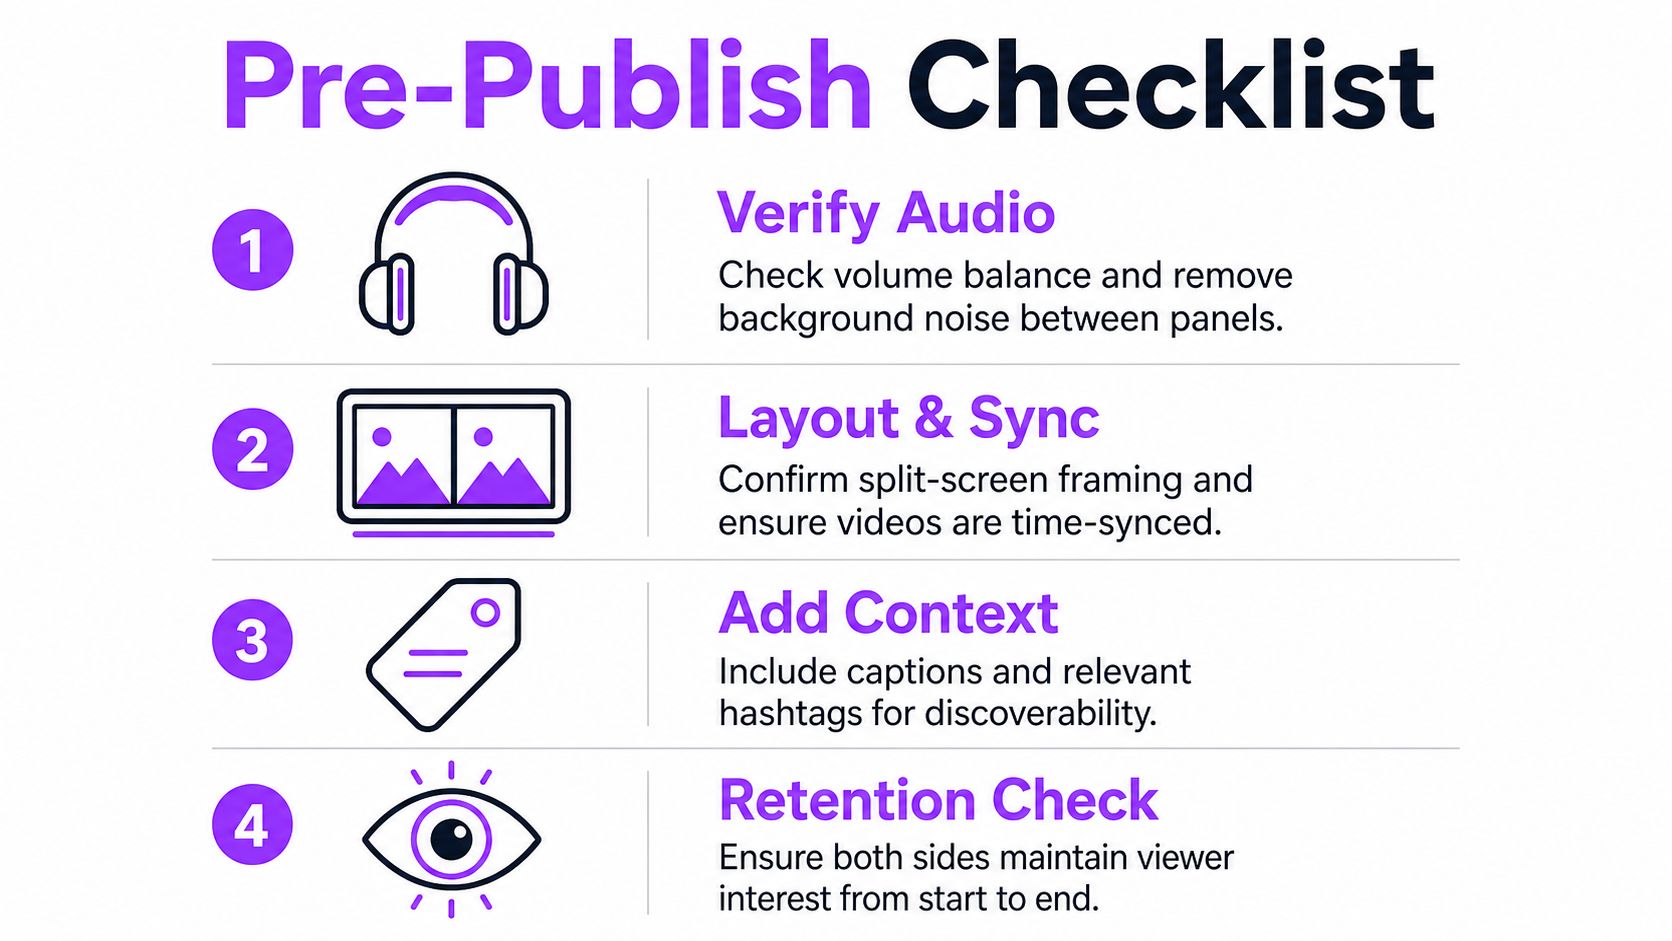
Check the sound first
- Balance audio: Make sure speech in one panel doesn’t disappear beneath gameplay, music, or a louder reaction track.
- Remove distractions: Reduce background noise and listen for abrupt changes after cuts.
- Confirm the hook: Both panels should support the opening idea rather than competing with unrelated sounds.
Inspect framing and timing
- Check the crop: Confirm that faces, gameplay objectives, HUD elements, and relevant chat remain visible in the vertical composition.
- Sync the action: Start the panels on the same meaningful beat, whether that’s a spoken phrase, visual reveal, or gameplay impact.
- Review the divider: Ensure the border separates the frames without wasting space or hiding important details.
Test captions and context
- Use safe placement: Keep captions away from TikTok interface areas and away from essential information inside either pane.
- Match the voice: Place each caption block near the person or panel delivering it.
- State the premise: Add enough context that a viewer understands why the two frames appear together without needing the original VOD.
Watch like a scrolling viewer
- Preview: Check the opening with sound off. The layout should signal its purpose through motion, facial expression, or visible text.
- Scrub for dead air: Remove empty starts, stalled endings, and cuts that leave both panels inactive.
- Confirm export settings: Check the vertical aspect ratio, resolution, caption rendering, and final file before posting.
- Match intent to layout: A comparison needs balanced visibility. A gameplay highlight usually needs a dominant action panel. A reaction needs a readable face.
If you’re managing several accounts or platforms, a workflow for auto-posting to social media can reduce file handling after the edit is approved. The final decision should still come from the preview, not from the convenience of a preset.
StreamGen turns Twitch and YouTube VODs into vertical clips with AI highlight detection, smart gameplay and facecam layouts, animated captions, silence removal, and direct scheduling to TikTok and other short-form platforms. Visit StreamGen to prepare your next split-screen short in one workspace, then publish the version that makes the viewing relationship clear from the first frame.
More blog posts